Showing posts with label eyeshadow. Show all posts

Sunday, May 26, 2013

The "Suits" Look: Rachel Zane


If you follow me on Twitter then it will come as no surprise to you that I have fallen head over heels for the TV series "Suits" (erhm, and vampire diaries....) . If you haven't heard about it then I will not even attempt to describe it as I will fail massively at making it sound interesting, but have a read here and check out this video for an idea of what it is about. I watched both seasons, all 28 episodes in about 72 hours which is for one crazy even for me, but also comes to show how addicting it is. So consider yourself warned, that if you manage to sit through the not "oh-so-amazing" first episode and proceed to watch the next ones, then you will most likely not be able to stop. 

But enough about the series and over to one of the gorgeous cast-members Meghan Markle, better known as the role of Rachel Zane. After watching both seasons, I realised that I wanted to do a make-up look inspired by her glowy, sultry look and well, here it is: my take on the Rachel Zane look. It isn't too different from my usual everyday look, but the liner is black, not brown like I usually go for and the skin is a tiny bit more glowing.

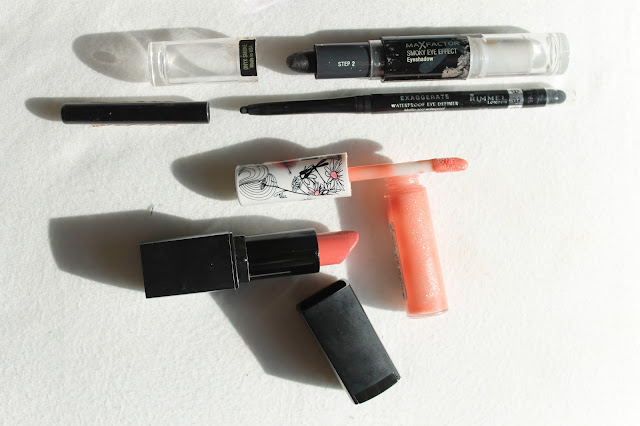
The products I used are shown in the photos below and as for how I did it, here goes: Use a base/foundation that has a dewy finish. Something like Rimmel's Wake Me Up (medium coverage) or L'Oréal's Nude Magique BB Cream (light coverage) works perfectly! I suggest mixing it with your primer, if you use one, to make it appear as natural as possible. Then, on a synthetic angled brush or a kabuki brush, apply the Bronze Universal to the cheeks, tip of the nose, hairline/forehead and anywhere the sun would naturally hit the face. This creates the illusion of a tan similar to Rachel's. For blush, go for a golden toned, warm coral such as the colour P Pie (far left in the blush palette) by Sleek. Apply this with an angled brush slightly below the tops of your cheekbones but not quite as low as a contour. Go over the high-points of your face with the Crescent Moon highlighter to add glow and dimension.

For the eyes, just smudge some of the Cream Shadow Stick along the base of the lashes and then blend it with a small pencil brush. For some extra definition, tight-line with a black liner and lightly line the lower lashline as well. Add some lipstick, I used a pinky- peach combo, and mascara and voila! You are done!

Top Left: Chanel Bronze Universal, Sleek Blush Palette in Pumpkin 363
Bottom Left: TopShop highlighter in Crescent Moon, Rimmel Wake Me Up foundationL'Oréal's Nude Magique BB Cream, The Body Shop Tea Tree Pore Minimiser

Top to bottom: Max Factor Smokey Eye Effect, Rimmel Exaggerate Waterproof Eye Definer in Noir, Maybeline (MNY) Lipgloss in a peachy pink colour - the name has rubbed off.., ELF Lipstick in Party Pink.


I hope you liked this post! If you have any looks you would like me to do a tutorial on, let me know in the comments and I will get to it! And don't forget to enter my giveaway for a chance to win a brush cleanser plus some other secret goodies. You can enter HERE!!


Lots of Love,
Em

FOLLOW ME:
Ps: If you fancy watching me do a challenge click HERE

Wednesday, April 03, 2013

Old Classic


Lately I have been loving a good winged liner with a little retro shadow to go with it. In other words "The Old Hollywood Glamour Classic". There are tons of tutorial and "how-to's" on how to create the perfect wing on your liner, but despite their different methods there is one thing they all have in common: PRACTICE!

I have tried, and tried again a hundred times to get my liner right, and finally I feel I know my eyes well enough to make the wing the right angle, length and width to suit them. A few week ago I went to a birthday party and did my make-up in a slight retro-inspired cut-crease with, of course, a winged eyeliner. Here is an overview of the products I used and how I did it all:


I stated by creating a base for my eyeshadow + liner by usind Urban Decay Primer Potion, then I packed on MAC Omega Eyeshadow all over the lid as well as in the crease using my Sigma E60  Large Shader Brush. Next I added MAC Espresso Eyeshadow with my Sigma E45 Small Tapered Blending Brush through the crease, making sure not to take it down towards the lashes in the outer corner but rather "flick" it out and upwards (very subtle "flick") to create more of that retro feel. I then blended any harsh lines with a Sigma E25 Blending Brush. Ok, eyeshadow done, now to the tricky part or as I like to call it the you-need-to-have-a-steady-hand-for-this part. The winged eyeliner. A tip to make this part less messy is to

1. Keep your hand steady by relaxing it against your face (in an appropriate angle that is) 
2. Start from the middle, make a thin line to the end of your eye, then do the inner half of the eyeliner. For this I used the L'oréal Super Liner Carbon Gloss3. Look straight ahead and put a dot where you want your wing to end, then connect the dot with the outer corner of your eyeliner. 4. Fill in your wing/ make the wing as thick as you want it and thicken up the eyeliner as well depending on what look you are going for. I kept mine quite thin. 5. Add mascara (I used 
L'oréal False Lash Telescopic Waterproof Mascara) and false lashes if you'd like (I used Eylure Pre-Glued Lashes #117) and voila!


That is how I do my classic, glamorous winged liner. If you try it yourself, let me know how it went, and if you have a blog/twitter/instagram and post a picture of it then share it with me as I would love to see your twist! Also if you have any other tips for applying liner, share them in the comments! :)


Lots of love,


- Em


FOLLOW ME:

Friday, March 01, 2013

Mila Kunis Inspired


I was playing around with make-up the other night and found myself crating somewhat of a Mila Kunis inspired look, and as a fan of her smokey eyes I figured I might as well make a post about it.

So, to create this smokey, eye-popping look all you need is a very dark brown eyeshadow, a lighter one (e.g. Espresso by MAC), a light brown with some slight shimmer (e.g. Soba by MAC), a black liner (e.g. Rimmel Exaggerate Waterproof Eye Definer in noir) and an optional highlighter for the inner corner of the eye (e.g. All That Glitters by MAC). For the face you need, except from a non-matte foundation of your choice,  a good, matte bronzer that will give your skin a naturally darker colour and glow (e.g. Chocolate Soleil by Too Faced), and a light coral-pink blusher (e.g. Fleet Fast by MAC)

For the eyes, you start by applying your dark brown shadow close to your lash-line and smudging it out and up across your lid, making sure it is darkest close to the lashes. I used the darkest brown in a mall palette by Isadora called 50 matte chocolates, which contains 5 matte, gorgeous neutrals. I applied and smudged this colour using a Sigma E30 pencil brush. Then I repeated this step for the lighter brown, Espresso, only this time I used a Sigma E25 blending brush which is a great, more affordable dupe for the MAC 217. Using a short shader brush, E20 by Sigma, I traced that same colour Espresso along the lover lash line to create that smokey feel all around the eyes. Then I dusted some of MAC's Soba over the lid to blend the colours and to make the look smoother and softer. To finish it off I applied some of All That Glitters  to the inner tear-duct using the Sigma E55 eye shading brush and then I lined the upper and lower waterline with the Rimmel eye definer. After curling the lashes and applying a good coat or two of the L'oréal Telescopic waterproof mascara  the eyes were done and looking a little like Mila Kunis' sultry and smokey eyes. 

The matte bronzer was swiped through the hollows of my cheeks as well as lighlty tracing my cheekbones and temples, down the bridge of my nose and along my jawline. The gorgeous and fresh blusher was popped on to my cheeks and poof! Just like that I thought I was looking at Mila Kunis' face.

Ok, maybe not, but I wish I did! She is absolutely stunning and although it is impossible for us mortals to reach that level of gorgeousness, the least we can do is try, eh? I hope you found this helpful and that I managed to make a half-decent recreation of a Mila Kunis look. If you try it, let me know! Or even tweet me a picture if you dare :)

I will now resume to my ever so exciting celebrity life as a Mila imitator...

...oh I wish...


-Em


FOLLOW ME:

Thursday, February 14, 2013

Cheap, but pretty damn good


 Accessories Palette: You Are Everything

Accessories has started (a while ago) doing their own makeup. I did not expect much from them as I rarely do from the non-beauty related brands. However when I got this palette for a photoshoot with my friend Siren (post about that here), I was very surprised at how good the eyeshadows are!

First of all, their pigmentation is close to many of the other high-street and high-end brands, secondly their consistency is smooth and creamy rather than chalky and powdery. In other words these colours don't cause any extreme amounts of fall-out. Great bonus. As for their lasting power, well I would say that this is where the quality drops. Unfortunately they don't last for more than about 4 hours without a primer, but if you do use a primer then you can expect the shadows to stay for about a good 6-8hours which is nothing to complain about!!

I think that despite the longevity this palette is a good thing to have in your collection of you like having many choices in one:) The opportunities with these colours are endless :)

I am for the record on vacation, skiing in Austria but I am trying (and have been trying) to keep my blogging up as best as I can. However that is why I have been posting reviews lately:) Hope you don't mind and that you are enjoying what I do post! Have a wonderful day and keep reading for more beauty and fashion posts.


- Em

FOLLOW ME:

Twitter - Pinterest - Bloglovin - Instagram (under the username emyly95)

Saturday, February 09, 2013

Everyday Shadows


It is not everyday that I actually take my time to stop by the step of applying eyeshadow in my makeup routine, but sometimes I get the urge to whack on a little somethin' somethin'. Yesterday I went to a concert with my mom so I decided to give a new shade a whirl. MAC Soba, in you come.

I started off with the base, the Maybeline Fit Me foundation in 120 to be exact. This foundation is pretty darn great, it has one of the best colour ranges, louminous finis, natural "barely there" appearance, whilst still giving a medium coverage that is buildable. Any extra concealing was done by Maybeline's Fit Me concealer in 15. A little bit of Chanel's Bronze Universal over the cheeks, nose and forehead and a light dusting of Topshop's highlighter in Cresent Moon, and face was done.

Then came the eyes. I used my trusty, personalized MAC quad containing Espresso and Omega, together with the new little baby under the name Soba. Soba all over the eyelid, Espresso in the outer corner and blended into the crease and  then Omega to blend any edges, was all I did to give a little depth to my eyes. For eyelashes, I curled them, then coated them with L'oréal Telescopic mascara in waterproof and Maybeline Illegal Lenghts mascara (also waterproof). 

Only one more thing left, and that's lips. I used MAC's Rebel lipstick which is one of my favourite lipsticks of all times. A coat of this, blotted with a pinkie finger and voilá! Done, and done.

I hope you liked this rundown of my FOTD (Face Of The Day - yesterday). I am trying to mix things up on my blog with a little bit of a lot of things within the beauty and fashion business, including some travelling, so I hope you don't mind the variety. As always, just let me know with a comment or tweet if there is anything you want to see, or don't want to see or just something you want to ask :)


- Em


FOLLOW ME:

BLOGGER TEMPLATES BY pipdig