Showing posts with label MAC. Show all posts

Tuesday, July 29, 2014

Product Picks For A Summer Face


When it comes to face makeup I can't get enough. I love trying new primers, bases, bronzers and highlighters. The whole shabang. As it's been absolutely gorgeous weather over here this summer (past few weeks have been sunfilled and hot hot hot - talking 30 degrees) I haven't been wearing much on my face most days, but on makup days the following has been my go-to mix for the face:

To prep and give my face a bit of colour and glow I use Clarins Instant Smooth Self Tanning and my well loved Laura Mercier Radiance Foundation Primer. If I feel the need for foundation I will go for Chanel Vitalumière Aqua and then go over the under eye area and any spots with my MAC Studio Finish Concealer, some days though I skip the foundation and just go over with some studio finish.

To shape things up I reach for Too Faced Chocolate Soleil for some bronzing and contouring as I find that this product has the perfect colour tone for me for the summertime. For blush I tend to go with MAC Extra Dimension Blush in Seduced at Sea unfortunately this is limited edition from the Alluring Aquatics Collection but I do believe you can still get it online. If not Benefit Rockateur is a good dupe. To finish it all off I use the highlighter in the Urban Decay Naked Flushed palette and I have to say - this is probably my favourite highlighter of all time. 

So that's it, my go-to summer face makeup for the days I feel like putting on a little something something. I'd love to know if you have a few products you reach for more during the warmer months! Let me know in the comments!

Love, Emilie 

Tuesday, July 22, 2014

Top 3 Summer Lipsticks

MAC Show Orchid / MAC Lady Danger / Chanel
 I have been a 'beauty gal' for quite a few years now but its only this past year or so that I've found a love for lipsticks. I am still not a fan of the lipgloss and don't really see that changing any time soon but lipsticks, oh yes. 

The only thing with me is I don't go for the typical nudes and pinks. If I wear lipstick it is more often than not a bright or bold one, and if I do go for a nude it is one out of the only two I own. A post all about my two nudes is coming right around the corner so stay tuned if you're a nude lips kind of girl.

Anyway, back to my point. Bold and bright lips. I love my MAC Rebel but sometimes I feel like something 'happier' as Rebel is sometimes a bit dark especially for summer and it is then that I reach for the three above. 

Show Orchid has been on my wishlist since I read about it on Becky's blog(One you definitely need to check out if you haven't already. She's a top girl that one) and I finally got my hands on it at the pro store in London. It's a MAC amplified so it is super opaque and has a bloody brilliant staying power. All 8 hours of my shift with only one teeny touch up to be precise.

Lady Danger was all Molly's fault (another top girl right there), although I do thank her for making me buy it as it is the most perfect matte, orange toned red I have come across.

As for the Chanel Mélodieuse - Who can say anythng bad about chanel?  This bad boy has got the mix of peach and pink just right so that I don't feel like a barbie doll nor a wannabe fruit. It has a very moisturising consistency and bit of a stain-like finish which I think is perfect for the summer months. I got mine in my Marie Claire beauty bag and it has been living in my bag ever since.

What are your go-to summer lipsticks?

Love,

Thursday, March 06, 2014

Prime(r) Time


I have always seen primers as a bit unnecessary but over the past 6 months + I have discovered that when you use the right one it can do wonders. Therefore I wanted to share with you my top picks when it comes to that first layer of makeup. Keep in mind I tend to go for ones that give a dewy finish and adds glow to your face. 

My latest addition but also clear favourite is the Laura Mercier Radiance Foundation Primer. This guy is the best of both worlds; adds the most gorgeous glow at the same time as it holds my foundation intact all day long, and you only need the smallest drop sized amount. Works wonderfully on its own with a tiny bit of concealer and powder or under BB cream or foundation. It was love at first try with this one. Available at Selfridges for £19. If you want a cheaper option then go for the L'Oréal Lumi Magique Base which is very similar although has a pearl like finish rather than the more golden finish that the Laura Mercier one has. Still gorgeous though and it does do a good job at keeping your make-up in place. Available for £9.99 at Superdrug. The Dior Airflash CC Primer smooths and very subtly evens out your skin tone. It doesn't add any glow in particular but is very light and perfect to spray on under a BB cream for a good but not too heavy primer. Get it at Feelunique for £30. Last, but not least is the most illuminating and glow-giving out of them all; MAC Strobe Cream. Not exactly a primer in my eyes as it doesn't do much for the longevity of my foundation but it is absolutely a great base for those days when you need to add some life back into your face. Looks good with just a bit of powder on top or under any base that you normally use. Get it here for £23.50.

Do you have any favourite primers or prep products for your base? Let me know in th comments and I might try it out! Also leave your bloglink if you have a bloglink as  I am always on the lookout for new ones to read and follow. 

Love,
 Em

Sunday, November 03, 2013

Easy & Quick Day-To-Night Look

So I guess we can all agree on that consistent posting is not my strong suit...
Today however I decided to do a whole 'day-to-night' dedicated post all on how I very quickly transform my normal day look into a much more dramatic and glamorous night-look. Grab your Rimmel Scandaleyes products and one of your UD Naked palettes and lets get to work.

DAY


For the base I kept it light and natural with some BB Cream and a light stroke of bronzer/blusher.  On the  eyes I used th Rimmel Shadow Stick on my outer corner, blended that in with the Eye Paint and then lined the upper lashline and outer corner of the lower lashline with MAC's Teddy. After some curling of the lashes I added my go-to mascara.

NIGHT


I wanted my nighttime look to be quick but still flawless and quite dramatic. I touched up my foundation with True Match (a new little favourite), then did some contouring with Hoola and added a bit of glow with my TopShop Crescent Moon highlighter. With a little pencil brush in my hand and some tissue under my eye to catch any fall down I used the matte black in the Naked2 palette to create a strong, but well blended outer v shape. I took it into the crease a bit and along half of the lower lash line. Could also have done this using the colour Creep from the original Naked palette. I made sure to build up the v shape to be very black, smoky and intense. I added the gorgeous gold colour Half Baked to the lid space not 'occupied' by the black, then took it along the inner half of the lower lash line. I made sure to make the gold very upaque before I softly blended the line between gold and black to soften the harshness of it.

Then after a quick coat of mascara I was done. It might sound like a long process but trust me it wasn't. I hope you all enjoyed this post. I am going to try and do a weekly post from now on as I think that is a realistic goal. If you have anything you'd like me to blog about then let me know and I will get on it! Also, thank you to everyone who follows me on Bloglovin - I just hit 100 followers the other day and I am so so thankful to all of you who read my blog. If you haven't yet but want to you can go here to follow me! 

Love, Em

Saturday, October 05, 2013

'The Night Out Prep'

Ok so I have now had an unacceptably long break from blogging whilst settling in to uni, which by the way is incredible. I love the people I live with, the course I am doing, the people on my course, the city I'm in and basically just everything. Since arriving I have been trying to just focus on being here and taking everything in so I decided that my blog would just have to wait. Until now! I'm back and I have missed typing away on my keyboard so expect to hear from me in between my lectures and events from now on. 

Over to today's post! Seeing as there has been a lot of partying and going out these past few weeks I have found that I tend to do more or less the same little beauty routine every time, and as it has been working really well so far with keeping my skin clear, hydrated and glowing all day and all night I figured it was only right to share it with you. 

Stage 1: The Prep 10 minutes with Origins Drink Up Mask makes sure my skin is hydrated and soft, then a quick cleanse with Liz Earle's Cleanse & Polish and a blob of Benefit's Triple Performance Facial Emulsion and my face is ready for Stage 2: The Base.

Stage 2: The Base A drop of MAC's Strobe Cream mixed in with my well loved DiorSkin Nude BB Cream makes for a gorgeous glow and flawless finish that's perfected with some Studio Finish Concealer for any redness. Benefit's Hoola Bronzer and Rockateur Blush make the perfect combo for a bit of contouring and colour.

Stage 3: Eyes My favourite part, including two new discoveries that has revolutionised my eyeshadow routine. A quick, thick line of Rimmel's Eyeshadow Stick in Bad Girl Bronze blended together with Rimmel's Eyeshadow Paint  in Rich Russet makes for the easiest smokey eye ever. Add a bit of a warm brown, such as this one from Dior's Grège palette, to add slightly more definition then some mascara and you're good to go once you have your brows set. For that I swear by Benefit Brow Zings especially for night out's as it has incredible staying power. 

There, that's that. A bulletproof look that will stay on and look good all night - none of those horrendous pictures where your eyeliner is on your cheeks and your eyebrows have melted together into a mono. I hope you liked this post, if you did please go and follow my blog on Bloglovin' and you won't miss my next post :)

Love, Em

Wednesday, June 19, 2013

MAC oh MAC


Naughty, Naughty...

Ahh, there really is nowhere like home, or at least nowhere like my own bed. I am currently back in Norway and it feels good to know that I have a while to just relax, work a little and enjoy the summer before I head off to the rest of my summer plans. I might love travelling but I do love to staay at home a bit too :) Anyway, whilst I was in Colombia I headed over to the highly beloved MAC store I used to go to, just to take advantage of the better prizes and large selection (compared to the tiny counter we have here in my hometown). Although they didn't have the #1 thing on my list which is the lipstick Show Orchid ( on my wish list thanks to Becky over at Beauty and the B) I managed to leave the place with a few new products in my possession. Show Orchid is still on my list and I will venture out on an adventure like dora the explorer in order to get my hands on it, but apart from that my MAC cravings are settled...for now at least. Oh and sorry for the countless hauls now a days.. I promise this is the last one in a while, unless I do a clothing haul from Colombia as well in that case that will be the last one :) 

From Top: Eye Khol (teddy), Face and Body foundation (N2), Eyeshadows (Woodwinked -Top and Cork - Bottom), Cleanse Off Oil 


On Top: Face and Body in N2
Bottom Left: Teddy Eye Khol, Cork Eyeshadow, Woodwinked Eyeshadow.

Now let's just face the fact that what I said earlier was one big lie. What beauty girl can ever stop her MAC cravings? Not me at least. Satin Taupe, Charcoal Brown, Honey Lust oh the list of eyeshadows I wish I owned is endless, as is the list of lipsticks, paint pots and just all things MAC. If anyone ever feel like giving me a lifetime worth of MAC products don't hesitate to get in touch! Haha, oh I wish.

What is your favourite MAC product? Or if you don't own any, what is your favourite make-up brand?


Lots of love,
Em


FOLLOW ME:

Tuesday, June 11, 2013

A Little Beauty Haul


I went on a little shopping spree yesterday and picked up a few bits and bobs from the local drugstore/"colombian sephora".  I know I love to see what others buy so eve though I recently did one and probably will do a few more very soon, I figured I'd do one today as well, because a girl can never buy enough beauty products right?

Starting with the star of the haul, the Bioderma Micellaire cleanser has been on my wish list for quite some time now so when I saw it on the shelf I grabbed it before anyone had a chance to say "may I help you?" something they do every fifth second down here... Had my first try yesterday but I think I'll need to keep trying it before I say any big words about it.

Another product I've been eyeing is the Revlon Brow Fantasy which I have heard good things about from several bloggers and vloggers, especially MakeUpByTiffanyD. I got it in the shade dark blond but I think I could've got away with a brunette version. Haven't tried this yet, but a review will be up once I do!

Then I saw my little baby, the Hask Hair Argan Oil and well, I am now in possession of a fairly big stock of this life saver. I have one thing to say regarding this, and it is that it is the best and the cheapest hair oil I have ever tried. Double thumbs up.

Last but not least I had to get a new tub of the best leave-in deep hair treatment there is. The Orgnx EnRich hair mask saves my dry hair from being dry and leaves it nourished and healthy without being heavy or too silky soft.

 That was it for this haul, I have a clothes haul and a MAC haul coming up as well as another make-up post. Will try to get on with the OOTD's now that I am recovering form my long week of 'da flu'. Toodlepip!

Lots of Love
Em


FOLLOW ME:

Thursday, June 06, 2013

My Carry On Make-up Bag

Ok, let's do this. Considering the fact that I am still in bed feeling a bit under the weather my planned make-up look for today's post will have to wait until these puffy eyes clam down. Instead I bring to you the inside scoop on what I carry with me, make-up wise, when I travel and move around. Every girl has her essentials and these are mine!


 1. Compact spoolie and eyelash comb from No7. A lifesaver for clumpy lashes or bushy brows!

2. Bosca Green Tea Blotting Linens. Bought it at Sephora when I was in Orlando, and have loved it ever since - No more Oily T-zone!

3. Real Techniques Setting Brush. Perfect for a quick powder touch up of the T-zone.

4. Aqua Drop eye drops. As a contact lens wearer, this is a holy grail product for long days.

5. Burt's Bees Lemon Butter Cuticle Cream. I have very weak nails, but with this little baby I manage to keep them half decent and nurtured.

6. Revlon Kissable Balm Stain in Rendezvous for the days when I need a bit of 'umph' on my lips.

7. Rimmel Scandaleyes in Bulletproof Beige gives my eyes the pop of 'awake-ness' they need.

8. Maybeline Master Smokey Shadow Pencil. The quickest way to a smokey eye. Perfect for the Day-To - Night looks.

9.Clinique Bottom Lash Mascara. This works just as well on the bottom lashes as it does for touching up the top lashes. my little secret

10. Smashbox High Definition Concealer. It's not brain surgery, it's concealer...and it is needed.

11. MAC's Patisserie Lipstick. The perfect 'my lips but better' product. A lifesaver on stressful days.

12. Rimmel Stay Matte powder. The powder everyone raves about and loves - for good reason! Warm day? Long day? Busy day? This is your friend - don't loose it.

13. Carmex Lip Balm with cherry flavour and SPF 15. No one beats Carmex in my eyes. Moisture, lovely scent, sun protection and a hint of gloss.

14. Chanel Chance in my little Travalo! Perfume on-the-go for the girl who always forgets to spritz on some in the morning.

15. Bobby pins and hair ties are essential handbag/make-up bag essentials. You never know when you might need one :)

That's everything I keep in my 'to-go' make-up bag. Obviously it changes a bit but for now this is what I keep with me. What do you have in yours? I would love to know so let me know in the comments!

Lots of love,
Em


FOLLOW ME:
Ps: If you fancy watching me do a challenge click HERE

Monday, May 20, 2013

On the Brighter Side of Lippies


Summer is here, well almost at least, which means the make-up is lighter and the lipsticks are brighter, but I find that it can be hard to choose a fresh colour for the warmer months as there are so many out there! Therefore, in order to help you choose yours, I am bringing you my 3 current favourite bright lipsticks.

First one to enter the spotlight is one of the well renowned Revlon Lip Butters, this one is in the bright pink colour called Sweet Tart. I absolutely adore the consistency of this lipstick! It is smooth like butter (duh...), moisturising like a lip balm and slightly glossy - just enough to make your lips look luscious and fresh! Although it is not completely opaque, it is pigmented enough to keep you from having to apply ten layers for it to be true to its colour.

Next up is from the peachy - coral spectre of the colour ring. Let me introduce you to my go-to summer lip, Costa Chic a frosted coral by none other than MAC. Compared to the Revlon lip butter, this little tube contains more than  enough pigmentation. A quick slide over the top and bottom lip and you are left with gorgeous, non glossy, but slightly frosty, coral lips. Although it is not a dry lip product, I do suggest applying a lip balm in advance just to avoid any flakes or dryness. 

Last up on stage is the most "out there" shade of the three as is is an amplified MAC lipstick called Watch Me Simmer. I mentioned this in my april favourites post but did not go into any debts about it. Well then, it is a very vibrant coral colour with a little bit of pink in it. Just imagine a watermelon/strawberry popsicle and you've got it. This little bad boy doesn't have any frost, sparkle, gloss or shimmer in it so it leaves a fairly matte but creamy finish. I do find that without a lip balm under it or a gloss over (which never happens in my "I am not a fan of lip gloss" state of mind) it tends to feel quite dry so do a bit of scrubbing and moisturising before you put it on. Once it is applied it won't go anywhere for a while though, so a top-up isn't needed until a good 3-4 hours or so, unless you eat a big-ass meal..then I'd keep it ready just in case.

Alright, that was my three little babies whom I have now let you meet. I hope this was of some sort of help or at least interest to you. If you have any favourite lip products for the summer months then let me know in the comments as I am always interested in finding new products to love! 


And just a quick note, I will be doing a giveaway during the next couple of weeks as I am about to write my 100th post and want to celebrate! Keep an eye out for that, and if you want to make sure you won't miss it, you can follow me on twitter  and I will announce it there as well :)


Lots of Love,
Em


FOLLOW ME:
Twitter - Pinterest - Bloglovin - Instagram - Polyvore - Keek - Youtube
Ps: If you fancy watching me do a challenge click HERE

Thursday, May 09, 2013

Take Me To Arabia, Please

I have always thought that arabian inspired makeup is absolutely stunning, but it is a bit over the top for every-day wear in my opinion. Therefore I took upon me the task of creating a slight arabian-ish eye look that would be wearable for at least a party if not everyday. Continue reading below the pictures for a step-by-step tutorial.


How To:

1. Start off by applying your base and fill in your eyebrows (use whatever floats your boat for this step, really) I used Boots Tea Tree Pore Minimiser, Revlon Nearly Naked Foundation and Maybeline FitMe Concealer. And for my brows I used the NYX Eyebrow Pencil in Taupe.

2. Apply a shimmery, warm, nude cream shadow all over your lid. Rimmel Scandaleyes in Bulletproof Beige  is perfect for this. Over this cream, apply a similar shade in eyeshadow form, All That Glitters  from  MAC is what I used, which is a shimmery, golden pink colour.

3. Through the crease I applied Urban Decay's Buck (from the Naked palette) which is a warm, light brown. Focus most of the colour in the outer part of your crease and make it softer as you blend it towards the inner half. Also trace this colour along the lower lash line.

4. Eyeliner time! I used the L'oréal Gel Intenza Eyeliner in Violet Black with a small eyeliner brush by Sigma (#E10). This eyeliner is a deep violet shade with a hint of shimmer in it, and I created a thin line all across the upper lash-line as well as creating a long, thin flick on the outer corner. I also took it down to a little point in the tear-duct to create that feline, arabian look.

This is where I applied some false lashes, but feel free to skip that and just go for mascara on its own, I just felt like going all out.

5. For contouring I used Sleek Contour Kit in medium (along my temples, sides of my nose and under the cheekbones) and for blush I used a vibrant, shimmery orange-red colour  called P Pie which is also by Sleek. 

6. To finish it off I applied Rebel lipstick by MAC. This is one of my all-time favourite lip colours and I adore the combination of the golden eyes and the berry lips.


I hope you enjoyed this post! Please let me know if you try it and tell me how it went. Also let me know if there are any specific make-up looks you would like me to do! I am open do making it in video form if that is more preferable. Just pop it in a comment below and I will make sure to add your suggestions to my list :)


Lots of love,
Em


FOLLOW ME:
Twitter - Pinterest - Bloglovin - Instagram - Polyvore - Keek - Youtube
Ps: Click HERE for a video all about unexpected events!

Monday, April 29, 2013

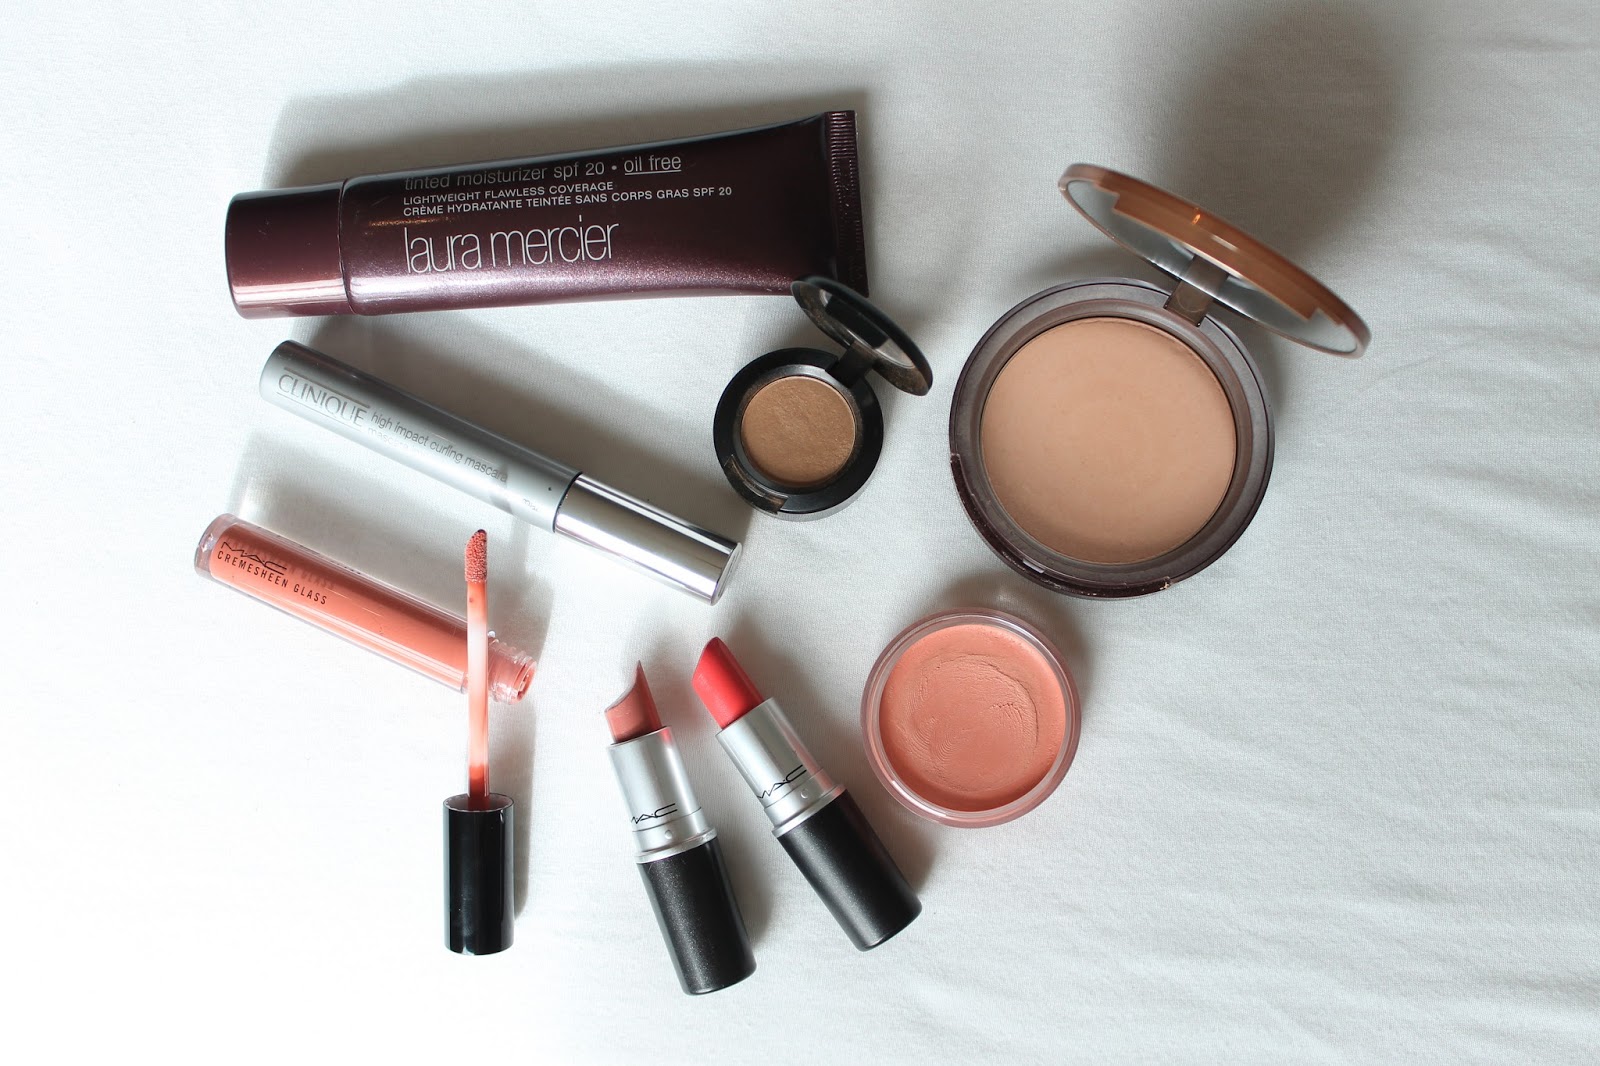
Beauty Gems From April


FT: MAC Watch Me Simmer, MAC Patisserie, MAC Over Indulgence Cremesheen Glass, Clinique High Impact Curling Mascara, Laura Mercier Tinted Moisturizer Oil Free

FT (excluding lipsticks): MAC Soba Eyeshadow, Too Faced Chocolate Soleil Bronzing Powder in Original Chocolate, Revlon Pinched Photoready Cream Blush

It is that time of the month again! No, not that time of the month, but the time when a new month is approaching and all beauty bloggers and vloggers freak because they have to remember their favourite products from the month that is ending. Luckily I have been good this month and kept a list of all the products I wanted to mention! *stop typing to tap my shoulder* I might do a "second half" of this post where I go off on about other beauty products I have been loving such as skincare and haircare if that is something you'd all like?

Anyway, let's dive into this jumble of loveliness! First off: Lip products! For once I have been wearing something on my lips more or less everyday for a long period of time (I used to always get bored of reapplying and carrying around a lipstick...) and wait for it; I have been wearing a lipgloss! Some of you may know that I am not a huge lipgloss fan but this month I have been loving the combo of MAC's Patisserie with Over Indulgence over the top. This neutral, earthy-pink combo (earthy-pink, really? oh well I am awful at describing colours) makes a perfect everyday, sophisticated lip colour and the best part is that it lasts for quite a few hours before it needs any topping up! My other lip favourite has been Watch Me Simmer also by MAC! Super bright, coral/pink-y in colour and perfect for spring and summer! Wearing this makes me happy, and although it is a product that requires precise application it is super long lasting (it is an amplified lipstick) and very pigmented so once again, no need for frequent re-applications. That makes me a happy bunny.

Over to eyes! Only two products made it in this month and those were Clinique's very famous High Impact Curling Mascara and MAC's Soba Eyeshadow! Both are super products, obviously they woulden't be mentioned here if the weren't, and I have been using them both more or less everyday. The mascara is maybe not the best at curling but a coat of it over my Telescopic Waterproof mascara and my lashes look superb with volume, thickness, length and definition! The eyeshadow has been mentioned here on the blog before and there's nothing to say but that this is the best eyeshadow for a quick, all over the lid, wash of colour. 

Face, face, face, face. I have been loving my recent foundation routine and it is down to mainly two products. Laura Mercier Tinted Moisturizer and Too Faced Chocolate Soleil Bronzing Powder will give anyone who asks for it a glowy, soft, airbrushed-looking skin. The tinted moisturizer has the consistency of something super silky smooth and the powder has warm, but not orange undertones which can give even me the illusion of a tanned face. Believe me, that's not all that easy. Last but not least, the Revlon Pinched Cream Blush is natural yet fresh and glow-giving with its hint of shimmer and peach tones. I loves it very much.

That was all of my favourite beauty products for the month of April, but I would love to hear about yours so please leave them in the comments or link me to you blogpost/video if you have one of them :) I would love to check it out and discover a few new products!


Lots of love,
Em


FOLLOW ME:
Twitter - Pinterest - Bloglovin - Instagram - Polyvore - Keek - Youtube
Ps: If you fancy watching me do a challenge click HERE

Saturday, April 20, 2013

Saturday Skin Talk - The Glow


I decided to try something; A few posts set to specific topics and days. One of them will be Saturday Skin Talk, however I will not do one every saturday and some saturdays I might put up something else. But when I am in the mood for making a post about skin (foundation-tips/highlighter/ bronzer/blush/skincare etc) I will do it on a Saturday :) I will also come with a few more of these, although I haven't decided on which ones so if you have a suggestions or a request then let me know in the comments and I will be sure to read through them!

On today's agenda is "the glow". I know dewy and glowing skin has been huge on the SS13 runways this year, however it is not always easy to know which products are the best to use for different skin types/tones as using the "wrong" products and the application of them can sometimes lead to a shiny disaster...

Therefore I bring to you, my lovely readers;
Glowy Summer Skin 1-0-1!

I am no expert but I do know the basics (I am sure many of you do to), so to break it down for you into Do's and Don'ts:

Do use bronzer on the areas of your face where the sun would naturally hit you (forehead/hairline, cheeks/cheekbones, bridge of the nose and on your chin.
Do apply any shimmer/highlighter to the high-points of your face only. (E.g. Cheekbones, nose-bridge, cupids-bow).
Do make sure to blend the bronzer/highlighter or blush well enough for it to look natural.
Do choose colours that suits your skin tone. 
Do use cream products if you have dry or normal skin. Be careful with creams and too much shimmer in the products if you tend to get oily as it might end up looking very shiny - and that is not in a good way. (Powders are good for most skin types, except maybe very dry skins as they might end up looking patchy/flakey)

Don't use colours that are too dark for your skin tone. If they are slightly darker, make sure to blend properly and consider taking it lightly down your neck to make the transition seamless and natural.
Don't contour with your bronzer (at least not if it has any shimmer). Choose a cooler toned bronzer or an actual contour product instead.
Don't apply bronzer/blush in bad lighting. Try to get as natural light as possible, and if you do not have a lamp that provides this, apply your make-up near a window!
Don't take your blush too high/low/close to your nose as that will look unnatural and is less likely to be flattering than if you focus it on the apples of the cheeks and take it up along the cheekbones toward the temples.

Product Recommendations: 
Oily Skin: Go for powders that have little to no shimmer and apply them after you have set your foundation with a setting powder. Finish off with a setting spray such as MAC Fix + or one of the Urban Decay ones (e.g DeSlick). This way your glow will stay on better and longer, as  well as looking more natural than if you would skip the setting spray.

TopShop do some great powder highlighters that would be perfect and for blush and bronzer pretty much any brand has some good powder formulas these days but to mention some: Maybeline (the Dream Terra Sun Bronzer - i think- is supposedly very nice), Too Faced Chocolate Soleil, MAC blushers, Sleek blushers. 

Dry Skin: If you have dry to very dry skin, keep an eye out for cream products! They will give some moisture to your skin whilst adding life and sheen to the face. No need to set your makeup with a spray/powder, just apply foundation and go straight into your bronzer, blush and highlight! 

You all know how much I love the Chanel Bronze Universal cream bronzer, and for someone with dry skin this would work very well! Try one of the TopShop Cream Highlighters or maybe go for one by MAC - I know the colour Pearl is on my shopping list! Revlon do incredible cream blushers and so does Stila I have heard, so I suggest having a look at those if you want non-sticky but still creamy products!

Normal Skin: Here comes the lucky ones! If your skin is fairly normal/combination then all the products mentioned above will most likely suit your needs. Just get the application right and know what your skin needs regarding setting powders/sprays and you will be well off. 


Those were all my do's and don'ts and tips for getting glowy skin this Spring/Summer! I hope this helped some of you, and if it did or if you have any points you would like to add then please let me know in the comments! :)

If you have any requests for future posts of this kind (any beauty/fashion/life related topic you would like some help/information about!) let me know and I will try do it as one of the next "specialised" posts.

I wish you all good luck with getting your glow on! :)

- Em


FOLLOW ME:


Wednesday, April 03, 2013

Old Classic


Lately I have been loving a good winged liner with a little retro shadow to go with it. In other words "The Old Hollywood Glamour Classic". There are tons of tutorial and "how-to's" on how to create the perfect wing on your liner, but despite their different methods there is one thing they all have in common: PRACTICE!

I have tried, and tried again a hundred times to get my liner right, and finally I feel I know my eyes well enough to make the wing the right angle, length and width to suit them. A few week ago I went to a birthday party and did my make-up in a slight retro-inspired cut-crease with, of course, a winged eyeliner. Here is an overview of the products I used and how I did it all:


I stated by creating a base for my eyeshadow + liner by usind Urban Decay Primer Potion, then I packed on MAC Omega Eyeshadow all over the lid as well as in the crease using my Sigma E60  Large Shader Brush. Next I added MAC Espresso Eyeshadow with my Sigma E45 Small Tapered Blending Brush through the crease, making sure not to take it down towards the lashes in the outer corner but rather "flick" it out and upwards (very subtle "flick") to create more of that retro feel. I then blended any harsh lines with a Sigma E25 Blending Brush. Ok, eyeshadow done, now to the tricky part or as I like to call it the you-need-to-have-a-steady-hand-for-this part. The winged eyeliner. A tip to make this part less messy is to

1. Keep your hand steady by relaxing it against your face (in an appropriate angle that is) 
2. Start from the middle, make a thin line to the end of your eye, then do the inner half of the eyeliner. For this I used the L'oréal Super Liner Carbon Gloss. 3. Look straight ahead and put a dot where you want your wing to end, then connect the dot with the outer corner of your eyeliner. 4. Fill in your wing/ make the wing as thick as you want it and thicken up the eyeliner as well depending on what look you are going for. I kept mine quite thin. 5. Add mascara (I used 
L'oréal False Lash Telescopic Waterproof Mascara) and false lashes if you'd like (I used Eylure Pre-Glued Lashes #117) and voila!


That is how I do my classic, glamorous winged liner. If you try it yourself, let me know how it went, and if you have a blog/twitter/instagram and post a picture of it then share it with me as I would love to see your twist! Also if you have any other tips for applying liner, share them in the comments! :)


Lots of love,


- Em


FOLLOW ME:
BLOGGER TEMPLATES BY pipdig